
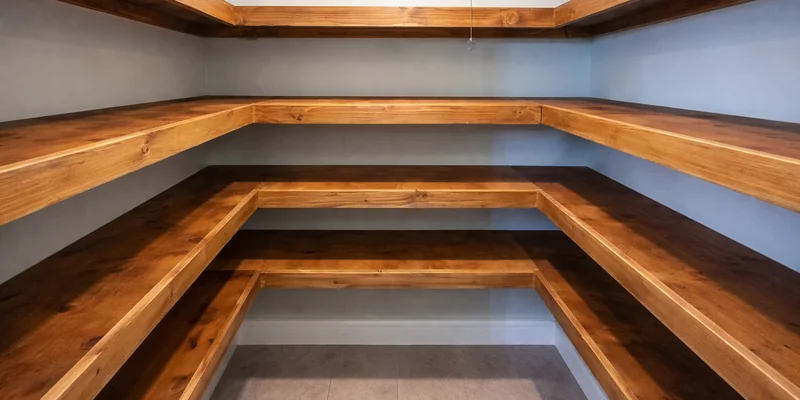
Building your own pantry shelves is a practical way to create more storage space and keep food items organised. You can choose the shelf sizes, spacing, and materials to fit your pantry instead of relying on ready-made options.
The process is also fairly simple if you have basic tools and some DIY experience. In this guide, I’ll explain how to plan, build, and install pantry shelves, along with a few tips to make them strong and useful.
Plan Your Pantry Shelves Before Anything Else
Before buying materials or cutting wood, take some time to plan your shelves. Start by measuring the width, height, and depth of your pantry. Also, check for doors, pipes, electrical outlets, or other obstacles that could affect the shelf placement.
Decide how many shelves you need and how much space to leave between them. Consider the items you plan to store. Canned food and small jars need less vertical space, while cereal boxes, large containers, and kitchen appliances need taller openings.
Also, think about how much weight each shelf will hold. Heavy food containers require stronger materials and proper wall support.
Choosing the Right Materials
The material you choose affects the strength, appearance, and cost of your pantry shelves. Here are some common options:
- Plywood: A popular choice for DIY shelves because it is strong, easy to cut, and available in different thicknesses.
- Solid wood: Offers good strength and a natural appearance. However, it can cost more than plywood.
- MDF: Has a smooth surface and is easy to paint. It works well for lighter storage but can sag under heavy weight.
- Metal brackets and supports: These provide support underneath the shelves and help secure them to the walls.
For most DIY pantry projects, plywood with sturdy metal brackets is a practical combination.
Tools and Materials You Will Need
Gather all the necessary tools and materials before starting the project. This will make the installation process easier.
Tools:
- Measuring tape
- Pencil
- Level
- Drill and drill bits
- Saw
- Sandpaper
- Stud finder
Materials:
- Wood boards or plywood
- Shelf brackets or wooden supports
- Screws
- Wall anchors, where appropriate
- Wood paint or sealant (optional)
Make sure your screws and brackets are suitable for your wall type and the expected shelf load.
How to Make Pantry Shelves Step by Step
Once you have your materials and tools ready, follow these steps to build and install your pantry shelves.
Step 1: Measure and Mark the Shelf Positions
Measure the available wall space and decide where each shelf will go. Use a pencil to mark the shelf positions on the walls.
Check the distance between the marks to make sure there is enough room for the items you plan to store. Use a level to keep the markings straight.
Step 2: Cut the Shelves to Size
Measure and cut your wood boards according to the pantry dimensions. Make sure each shelf fits the available space without blocking the door or other fixtures.
If you do not have the right tools to cut the boards, you can ask a hardware store or lumber supplier to cut them for you.
Step 3: Sand and Prepare the Wood
Use sandpaper to smooth the edges and surfaces of the shelves. This removes rough spots and helps prevent splinters.
You can also apply wood paint, stain, or sealant if you want to protect the surface and improve its appearance. Let the finish dry completely before installation.
Step 4: Locate and Mark Wall Studs
Use a stud finder to locate the wooden studs behind your drywall. Mark their positions because they provide stronger support than drywall alone.
If your pantry has masonry walls, use suitable masonry drill bits and wall plugs instead.
Step 5: Install Shelf Brackets or Supports
Position the shelf brackets along the markings you made earlier. Check that they are level and secure them using suitable screws.
Use enough brackets to support the expected weight. For longer shelves, add extra supports to reduce the risk of sagging.
Step 6: Attach the Shelves
Place each wood board on its supports and check that it sits evenly. Secure the shelves to the brackets with screws if the bracket design allows it.
Make sure the shelves do not move or wobble when you apply light pressure.
Step 7: Check Stability and Level
Use a level to check that all shelves are straight. Check the brackets, screws, and other supports to make sure everything is secure.
Before loading the shelves with food and containers, test them gradually with a small amount of weight. Avoid placing heavy items on any shelf that shows signs of movement or sagging.
How to Make Pantry Shelves Strong Enough for Heavy Items?
Pantry shelves often hold canned food, jars, bottles, and large containers. These items can become quite heavy when stored together, so proper support is important.
Here are a few ways to make your shelves stronger:
- Use sturdy materials: Choose quality plywood or solid wood instead of thin boards that can bend under weight.
- Install enough brackets: Add supports at suitable intervals, especially for longer shelves.
- Secure brackets properly: Attach them to wall studs or use anchors designed for your wall material and expected load.
- Avoid excessive shelf spans: Long shelves without enough support are more likely to sag in the middle.
- Distribute weight evenly: Keep heavy items spread across the shelf instead of placing them all in one spot.
Tips for Making Pantry Shelves More Functional
A well-planned pantry shelf setup makes it easier to find and reach everyday items. Keep these tips in mind when arranging your shelves:
- Use adjustable shelf heights: Adjustable supports let you change the spacing when your storage needs change.
- Leave room for tall containers: Make sure there is enough vertical space for cereal boxes, bottles, and large jars.
- Keep frequently used items within reach: Place everyday food items on shelves that are easy to access.
- Consider deeper shelves for bulky items: Larger shelves can hold appliances and storage containers, but avoid making them so deep that items get lost at the back.
- Add labels and storage bins: Group similar items together and label containers so you can find things quickly.
Common Mistakes to Avoid When Building Pantry Shelves
Even a simple DIY project can have problems if you overlook a few important details. Avoid these common mistakes:
- Not measuring the space properly: Incorrect measurements can leave gaps or make shelves difficult to install.
- Choosing weak materials: Thin or low-quality boards may bend when loaded with food and containers.
- Ignoring wall studs: Attaching heavy shelves directly to drywall without suitable anchors can cause them to pull away from the wall.
- Making shelves too deep: Deep shelves can make it difficult to reach items stored at the back.
- Leaving insufficient vertical space: Shelves that are too close together may not fit larger containers and food packages.
How Much Does It Cost to Make Pantry Shelves?
Making pantry shelves yourself can cost around $50 to $200 for a basic wooden setup. The final price depends on the pantry size, number of shelves, and materials you choose.
Here is a rough cost breakdown:
- Plywood or wood boards: $30 to $90
- Shelf brackets and supports: $10 to $40
- Screws and wall anchors: $5 to $15
- Paint or wood stain: $10 to $40
These estimates cover basic materials and supplies. You may spend more if you need to buy tools such as a drill or saw. Choosing plywood, using simple brackets, and doing the installation yourself can help keep costs down.
Conclusion
Making pantry shelves is a manageable DIY project that can improve your storage space and make your kitchen more organised. Start by measuring the available area, choosing suitable materials, and planning the shelf positions.
Then, cut the boards, install proper supports, and secure everything in place. With careful measurements and strong installation, you can build pantry shelves that fit your needs and hold everyday kitchen supplies.
Frequently Asked Questions (FAQs):
1. What is the best wood for pantry shelves?
Plywood and solid wood are both good choices for pantry shelves. Plywood is usually more affordable, while solid wood offers a natural look and good strength.
2. How deep should pantry shelves be?
Most pantry shelves are around 12 to 16 inches deep. Deeper shelves can hold larger items but may make things harder to reach.
3. How far apart should pantry shelves be?
Leave around 12 to 15 inches between shelves for general food storage. Adjust the spacing to fit taller containers, bottles, and appliances.
4. How thick should pantry shelves be?
Three-quarter-inch plywood is a common choice for DIY pantry shelves. Thicker or stronger materials may be needed for longer shelves or heavier loads.
5. Can I install pantry shelves without drilling?
Yes, you can use freestanding shelving units or tension-based shelf systems without drilling into the walls. However, wall-mounted shelves usually need proper fasteners for safe support.


Leave a Reply